RDT test: design and function: Difference between revisions
From MalariaETC
No edit summary |
No edit summary |
||
| Line 41: | Line 41: | ||
{| class="wikitable" style="border-style: none; border-width: 2px; border-color: gainsboro; color:black" | {| class="wikitable" style="border-style: none; border-width: 2px; border-color: gainsboro; color:black" | ||
|colspan="1" style = "font-size:100%; color:black; background: gainsboro |''' | |colspan="1" style = "font-size:100%; color:black; background: gainsboro |'''"POSITIVE" test result''' | ||
|} | |} | ||
This dye-labelled antigen/antibody complex | This dye-labelled antigen/antibody complex diffuses along the strip until it encounters an imobilised parasite-specific antibody on the strip. This immobilised antibody “captures” the labelled antibody/antigen complex forming a visible line (capture 1 = C). The remaining sample containing labelled antibody that has not bound antigen continues to diffuse along the strip encountering a further immobilised antibody that captures antibodies that have not bound antigen forming a control line. The control indicates that test has been successfully performed. | ||
Revision as of 23:00, 27 June 2024
Navigation
Go back
Test formats vary, but share common principles - this is illustrated using a test for a single P.falciparum parasite antigen below.
| TEST PROCESS |
In a typical test the buffer containing lysing agents is loaded into one window (A), then the blood sample is loaded into a second window (B). The interaction between blood and buffer causes lysis of the blood sample and the relaesed proteins diffuse along the strip where they encounter lablelled antibody (Ab). After encountering the antibody the lysate continues to migrate along the strip driven by excess buffer (blue arrow).
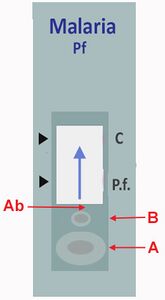
This process is also shown in more detail below: buffer (A) and blood sample (B) enter the strip. The lysed red cells and any parasite antigens then encounter the labelled antibody (Ab). If malaria antigens are present they bind to the antibody to form labelled immune-complexes (as shown).

The lysed red cell preparation containing free-labelled antibody and any labelled-immune-complexes then continues to migrate along the strip (red arrow) pushed by the remianing buffer (blue arrow). If the test has been performed correctly the lysed red cells will reach the end of the strip, first passing over the test (T) and control areas (C).

| "POSITIVE" test result |
This dye-labelled antigen/antibody complex diffuses along the strip until it encounters an imobilised parasite-specific antibody on the strip. This immobilised antibody “captures” the labelled antibody/antigen complex forming a visible line (capture 1 = C). The remaining sample containing labelled antibody that has not bound antigen continues to diffuse along the strip encountering a further immobilised antibody that captures antibodies that have not bound antigen forming a control line. The control indicates that test has been successfully performed.


(2) Where the parasite-antigen is present, the dye-labelled antibody will bind to that antigen to form a complex (binding=B). This dye-labelled antigen/antibody complex then diffuses along the strip until it encounters a second parasite-specific antibody immobilised as a band on the strip. This immobilised antibody “captures” the labelled antibody/antigen complex to form a visible line (capture 1 = C).
(3) The remaining lysed sample (containing labelled antibody not bound to parasite antigen) continues to diffuse along the strip. And encounters a further immobilised antibody that captures it. This forms a control line which indicates that test has been successfully performed (capture 2 = D).