RDT test: design and function: Difference between revisions
From MalariaETC
No edit summary Tag: Reverted |
No edit summary Tag: Manual revert |
||
| Line 32: | Line 32: | ||
(1) In a typical test lysis buffer is loaded into one window (A), then the blood sample in a second window (B)</br></br> | (1) In a typical test lysis buffer is loaded into one window (A), then the blood sample in a second window (B)</br></br> | ||
<gallery mode="nolines" widths= | <gallery mode="nolines" widths=200px heights=300px> | ||
File:1 PF_RDT_pre.jpg|<span style="font-size:90%"></span>|link={{filepath:1 PF_RDT-pre.jpg}} | File:1 PF_RDT_pre.jpg|<span style="font-size:90%"></span>|link={{filepath:1 PF_RDT-pre.jpg}} | ||
File:2 PF_RDT_lysate.jpg|<span style="font-size:90%"></span>|link={{filepath:2 PF_RDT-lysate.jpg}} | File:2 PF_RDT_lysate.jpg|<span style="font-size:90%"></span>|link={{filepath:2 PF_RDT-lysate.jpg}} | ||
Revision as of 08:27, 26 June 2024
Navigation
Go back
| Basic Principle |
If a patient has a malaria infection:
(1) A blood sample will be lysed in buffer to release parasite antigens, and expose them to dye-labelled antibodies
(2) The labelled antibodies will bind to parasite proteins forming an antigen-antibody complexes.
(3) These complexes are then captured by a second antibody immoblised on a nitro-cellulase to form a visible band.
(4) A control line binds lablelled antibody that has not bound malaria antigen showing the test was correctly performed

A positive "single band" type malaria test.
| How the tests work |
Test formats vary, but share common principles - this is illustrated for a single parasite antigen below.
(1) In a typical test lysis buffer is loaded into one window (A), then the blood sample in a second window (B)
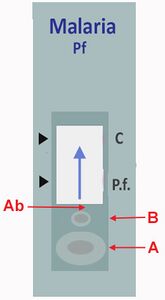
(2) The lysed blood and parasite antigens then meet a parasite-specific antibody labelled with dye (show strip and mixing of agents = A).

(2) Where the parasite-antigen is present, the dye-labelled antibody will bind to that antigen to form a complex (binding=B). This dye-labelled antigen/antibody complex then diffuses along the strip until it encounters a second parasite-specific antibody immobilised as a band on the strip. This immobilised antibody “captures” the labelled antibody/antigen complex to form a visible line (capture 1 = C).
(3) The remaining lysed sample (containing labelled antibody not bound to parasite antigen) continues to diffuse along the strip. And encounters a further immobilised antibody that captures it. This forms a control line which indicates that test has been successfully performed (capture 2 = D).